
Your Profile
An Overview of Your Panelist Profile
Your "profile" is a professional landing page that you can use to provide relevant information about your career and professional interests. This provides an easy way for our users to connect with one another based on mutual interests described on their profiles.
Your Panelist profile offers a snapshot of who you are as a professional — but don’t forget to customize it with a personal touch! Upload attractive cover images and headshots of yourself to personalize your profile to give other users a sense of who you are.
Think like a Panelist when presenting your profile on our platform. You never know when you might be headlining an event or booth as a speaker at any virtual conferences hosted by Panelists.
Completing Your Panelist Profile
Fill out your profile as completely as possible. To begin, navigate to the top-right corner of your home page, where the profile drop-down button is located to the left of the toolbar. Click on it to extend the drop-down menu, and click the ‘View profile button to go to your profile page.
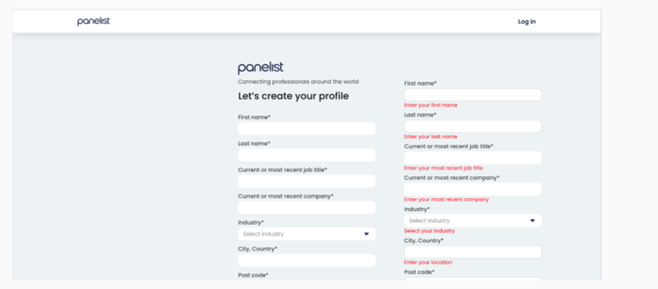
Your profile might look a bit empty in the beginning. However, you can easily start to fill in your career information and interests by clicking on the pen icon to edit your information or by clicking on the +symbols to add to your list of career experiences.
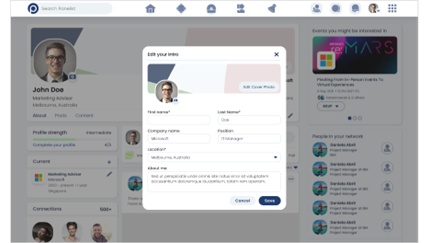
You can also click on your profile picture section or your cover photo section to upload attractive images to represent your Panelist profile. Once you’re done making changes to these individual sections, simply click the ‘save’ button to save any changes you’ve made.
Signing In and Out of Your Panelist Profile
Signing into Panelist is as easy as logging into your email account.
If you’ve already created an account on Panelist, sign in using your credentials at https://panelist.com/auth/sign-in.
Tap on ‘join now’ to create a new account using an email address.
You'll need to create a password to continue.
If you’ve already created an account on Panelist, sign in using your credentials at https://panelist.com/auth/sign-in.
Tap on ‘join now’ to create a new account using an email address.
You'll need to create a password to continue.
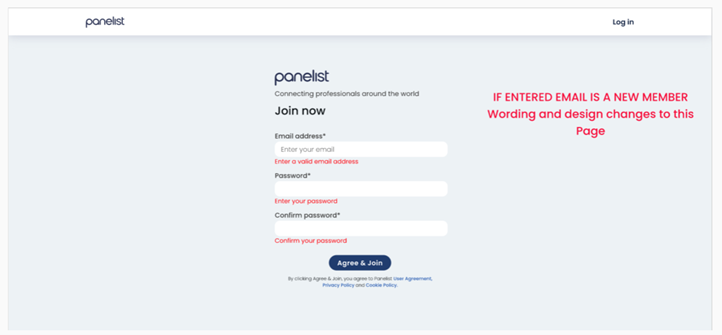
If you’re visiting Panelist.com and want to sign in, be sure to avoid clicking ‘Join Now’, so you don’t create a duplicate account to the one you already have.
Completing Company Profile
The company profile page is similar to the personal profile setup. From the homepage, navigate to the top right toolbar and click the grid icon to reveal a drop-down menu. In the menu, go to the header section ‘Create’ and click on the ‘Company’ option in the middle.
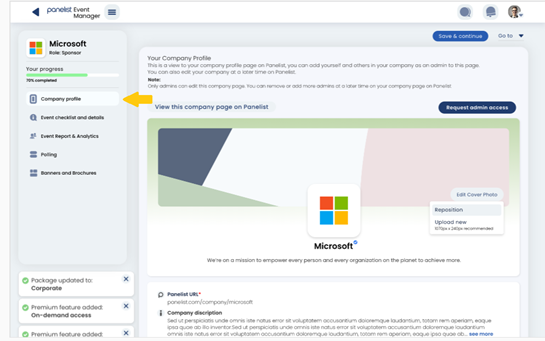
Remember to be as detailed and engaging as possible when describing your company profile. When filling in your company information, remember that it helps to consider how you could provide others an insight as to how your company aligns with their professional agendas on Panelist.
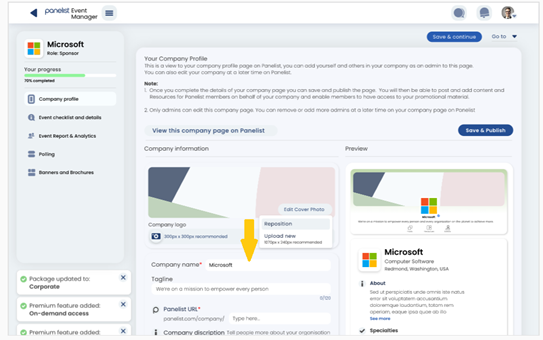
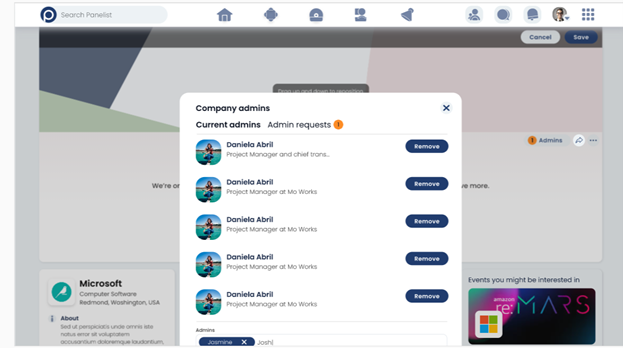
You can select an image as the Company's cover photo and also fill in the necessary details such as description and add admins to the profile page.

Adding administrators will allow others such as your team members to effectively help you manage and co-create content for your company’s Panelist profile.
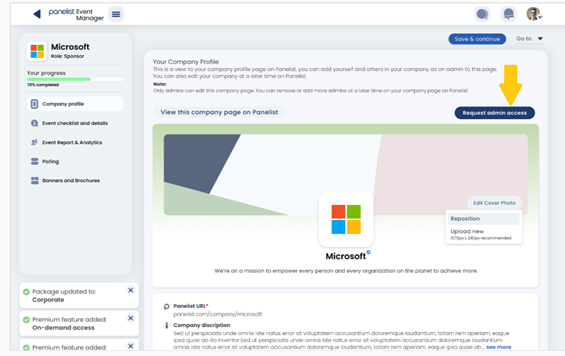
If you are a team member who requires administrative access to your company’s Panelist page, you can request for administrator access by navigating to the button at the top right corner of the company profile page.
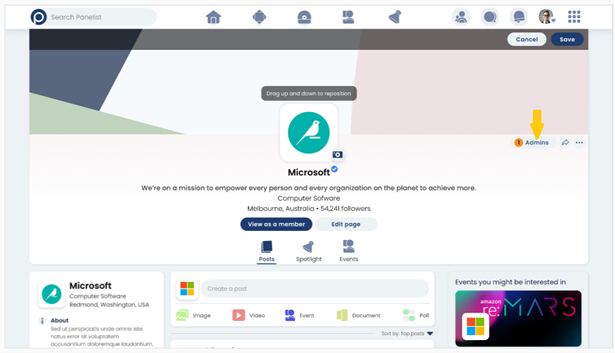
From your company’s profile page, you will be able to manage the number of administrators who currently have access. Do this by navigating to the top right button located beneath the cover image, and add or remove administrator as necessary.
Networking
Growing Your Network and Receiving Updates on Panelist
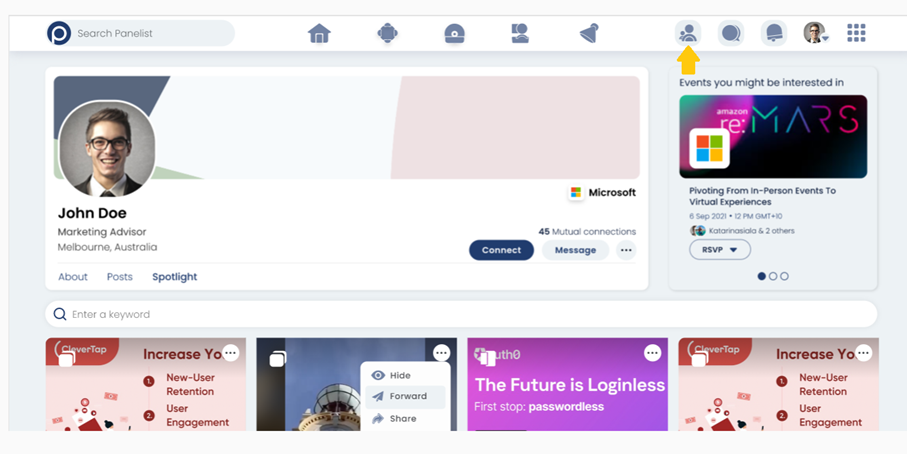
The ‘Network’ button on your top toolbar provides notifications whenever anyone on Panelist sends you a request to connect with their profile. Clicking this button reveals a drop-down menu of all the requests you’ve received to connect with other Panelist users.
Connections
Growing Your Network on Panelists and Managing Your Connections List
Scroll down on your profile page, and you’ll see your ‘Connections’ tab to the left, just below your ‘Past experience’ information.
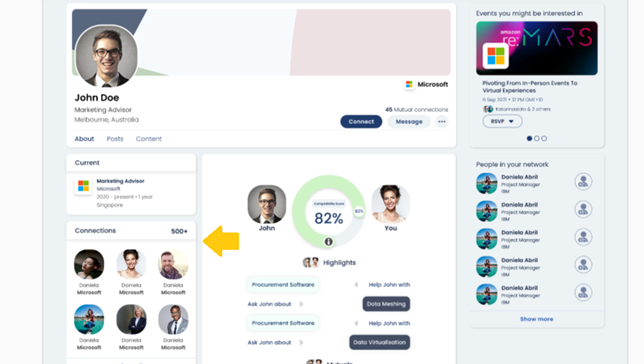
This section shows you anyone who views your profile with a preview of other users you’re connected to. You can display your connections by accessing your "Privacy Settings" on the Account settings page. Panelist provides the option for you to make your connections list available to those you’re connected to or only visible to you.
Messaging
Messaging in Panelist
Panelist provides a comprehensive virtual events platform for professionals to connect through their ideas — regardless of where they’re based.
To facilitate this connectivity, our messaging feature lets users contact each other, even if they aren’t already added to each others’ network. Our messaging feature enables you to keep things as casual or business-focused as you’d like. Whether you’re keen to pitch an idea to someone or collaborate with others on shared interests, Panelist’s messaging feature lets you do this for free.
To facilitate this connectivity, our messaging feature lets users contact each other, even if they aren’t already added to each others’ network. Our messaging feature enables you to keep things as casual or business-focused as you’d like. Whether you’re keen to pitch an idea to someone or collaborate with others on shared interests, Panelist’s messaging feature lets you do this for free.
Sending a Message
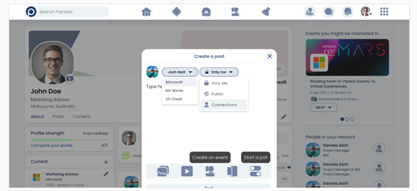
Whether you’ve added them to your network or not, you can easily send someone a message by clicking on the ‘Message’ button on their profile page.
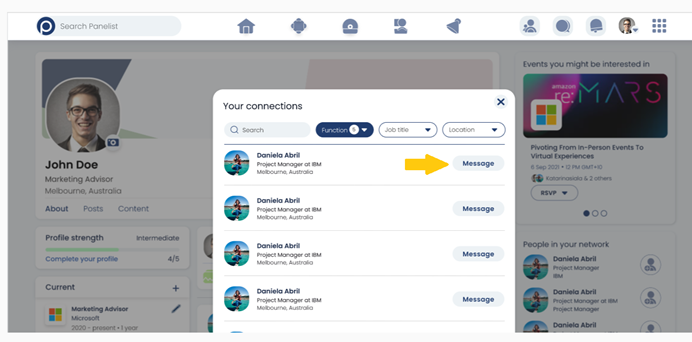
This launches the messaging tab, found near the bottom right corner of your screen while on Panelist.
Accessing All Your Messages
To view all your conversations, you can either bring up the Messages bar in the bottom right corner of your screen or navigate to the toolbar and click the ‘Messages’ icon. Clicking either of these will reveal a list of all your conversations.
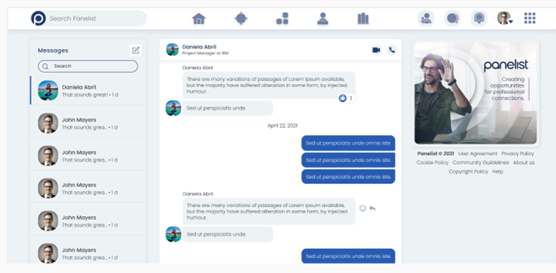
Click the Panelist logo at the top left of the messages page to return to your Panelist home screen.
Privacy
Manage Your Privacy Settings in the Account & Settings Page
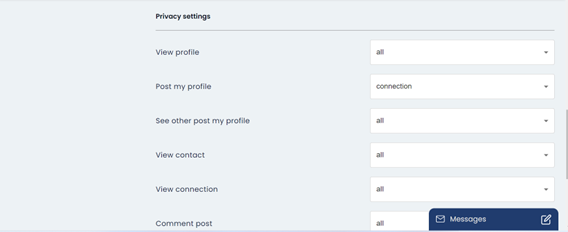
In the Account settings page, under ‘Account &Privacy,’ you’ll be able to manage what notification alerts you receive, as well as security features like blocked profiles and your privacy settings. The ‘Blocked Profiles’ segment allows you to manage a list of users you have prohibited from accessing your profile if you suspect them of abusing community guidelines or spam activity.
Your privacy settings can also be adjusted to determine the visibility of your profile. If you’d prefer to keep limited visibility, you may choose to let only those of your connections view any information you share. Select ‘Connections’ in any drop-down field to limit what other users can see on your Panelist profile.
Accessing All Your Messages
To view all your conversations, you can either bring up the Messages bar in the bottom right corner of your screen or navigate to the toolbar and click the ‘Messages’ icon. Clicking either of these will reveal a list of all your conversations.
Click the Panelist logo at the top left of the messages page to return to your Panelist home screen.
Subscription and billing
Access Unlimited Events with a Panelist Subscription
Navigate to the Account settings page by clicking your profile icon on your top right toolbar.
Here, you’ll see the ‘Billing and subscription’ option in the drop down menu. When you get to the page, scroll down, on the sidebar to the left, you'll find the Subscriptions & Billing menu options. You'll be able to update your Payment Details, Subscription Plan, and also view your Transaction History for any payments made.
As a new user, you’ll receive three free events to attend.
To subscribe or make payments on Panelist, simply click ‘Payment details’ to add a valid card number, and you’ll be able to subscribe to our paid services. Your security and privacy are important to us, so we’ve provided a ‘Transaction History’ page that lets you see all the payments you’ve made on our platform.
If you’d like to export this transaction history to make business claims for example, we also provide the option for you to export your payment data in CSV format.
Search
Searching For People on Panelist
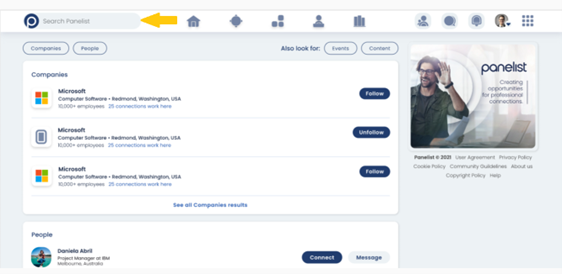
Searching for people on Panelist is just one of the key features we provide, to help professionals like yourself grow their network of contacts. Use the Panelist search bar at the top of your page, to find others with similar interests, professions, and even influencers to widen your professional network.
To find someone on Panelist:
1. Enter search keywords like the name of your contact, in the search bar at the top of the Panelist homepage.
2. A drop-down list will appear with matching suggestions. Pick a profile from this drop-down list, or click ‘See all results’ at the bottom of this list, to view all possible profile matches for your search.
3. Panelist’s search function uses predictive search features, so related profiles will appear in the drop-down list.
If you’re searching on a desktop or laptop, hit enter on the search bar, and you’ll be taken to the search results section, even without entering a keyword.
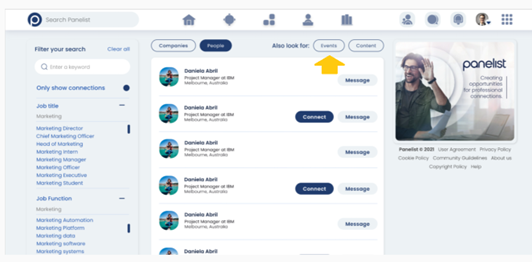
Here, click the ‘People’ button to see only theprofiles of other Panelist users in your search.
1. Enter search keywords like the name of your contact, in the search bar at the top of the Panelist homepage.
2. A drop-down list will appear with matching suggestions. Pick a profile from this drop-down list, or click ‘See all results’ at the bottom of this list, to view all possible profile matches for your search.
3. Panelist’s search function uses predictive search features, so related profiles will appear in the drop-down list.
If you’re searching on a desktop or laptop, hit enter on the search bar, and you’ll be taken to the search results section, even without entering a keyword.
Here, click the ‘People’ button to see only theprofiles of other Panelist users in your search.

Panelist also provides search filters, to help you sort and specify your search results more efficiently.
1. Select from any of the filters found at the top of the search results page; i.e. Job title, Job function, or Company.
2. Dropdown tabs will also appear to the right of your selected filter tab, so you can add these variables to specify your search; i.e. Add specific job titles like ‘Accounting Director ’to narrow your search.
3. Your search results automatically update with each filter and drop-down option selected. You’ll see your search results automatically refresh with each filter option you select.
4. You can also enter specific job titles or company names within the text field found with each of these filters.
Once you’ve found your contact, you can click on their name to view their profile, and click ‘Connect’ to add their profile to your network, or ‘Message’ to contact them directly.
Searching For Events on Panelist
You can also use Panelist’s search function to find events to attend. Click on the ‘Events’ button at the top of the search page, to display only event-related search results. Similarly, you can use the filter tab to sort by specific qualities like ‘Event Size’, or ‘Event Industry’.
If you’ve found an event that you’re interested in, you can always click the ‘Join’ button to visit the event page.
Searching For Content on Panelist
The Panelist search bar also lets you search for available content in your network. Click the ‘Content’ button, at the top of the search page. You can also use the filter options to the left of the page, to sort out your content according to a variety of options.
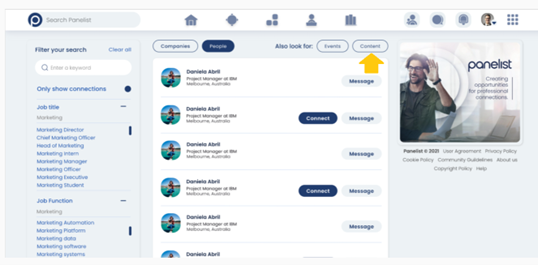
Here, you can click on your chosen content to go directly to what’s been published, or click the three dots next to the preview window, to share your content on your profile.
Tips:
● Search for popular influencers by using keywords like a company or job title, e.g. “Elon Musk Tesla”.
● If you need to get in touch with someone at an organization whom you’ve not been introduced to, try searching for “Marketing Director TikTok”.
● Panelist also allows for generic searches, so you can enter job functions in the search bar to browse results for professionals who work in similar roles. Alternatively, you could also try searching for events within a particular industry, or in a specific location based on your selected filters.
How to View (or Delete) Your Search History on Panelist
We’re working on letting our users view the history of their searches on Panelist, and if they need to, clear these searches by deleting them.
In the meantime, stay tuned for updates as we roll out more functionalities across our platform.
In the meantime, stay tuned for updates as we roll out more functionalities across our platform.
Panelist Events
Searching For Events on Panelist
You can also use Panelist’s search function to find events to attend. Click on the ‘Events’ button at the top of the search page, to display only event-related search results. Similarly, you can use the filter tab to sort by specific qualities like ‘Industry’.

If you’ve found an event that you’re interested in, you can always click the ‘Join’ button to visit the event page.
On the event page, you’ll find event details, along with the option to register for the event. button. Additionally, you can also invite your Contacts to register for events, either by clicking the ‘Invite connections’ button, or by sharing the event page out to your profile. Click the arrow icon, or the three dots to the right of the event page to do this.
On the event page, you’ll find event details, along with the option to register for the event. button. Additionally, you can also invite your Contacts to register for events, either by clicking the ‘Invite connections’ button, or by sharing the event page out to your profile. Click the arrow icon, or the three dots to the right of the event page to do this.
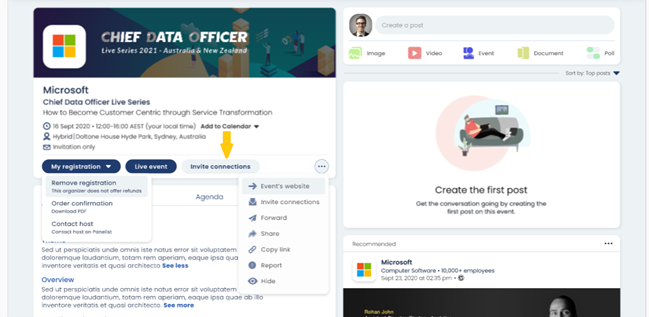
Scroll down on the event page, and you’ll see other useful information about the event you’re interested in. Panelist events can help communities of professionals to gather around ideas, or topics most important within their industries.
On Panelist event pages, you’ll also see a post feed that you and other users can contribute to. Whether you’d like other event attendees to consider a document you’ve prepared, or share other relevant content on the event page, we’ve provided a number of options to foster an interactive shared idea space with every Panelist event.
On Panelist event pages, you’ll also see a post feed that you and other users can contribute to. Whether you’d like other event attendees to consider a document you’ve prepared, or share other relevant content on the event page, we’ve provided a number of options to foster an interactive shared idea space with every Panelist event.
Invitations
Connecting through Your Panelist Profile and Panelist Events
Because Panelist is all about networking through content and virtual events, you can expect to receive different invitations to connect with other users, or to attend events that you may be interested in.
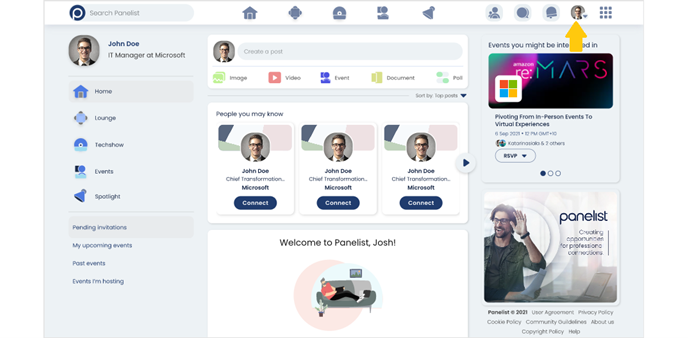
You’ll see these appear as requests, via a drop down menu that appears when you click on the ‘Notifications’ icon on your homepage top toolbar.
Each of these items on the drop down menu is either are quest from someone to connect with you, or an invitation to attend a suggested event. You can click to either ‘Accept’ or ‘Decline’ these invitations when you receive them.
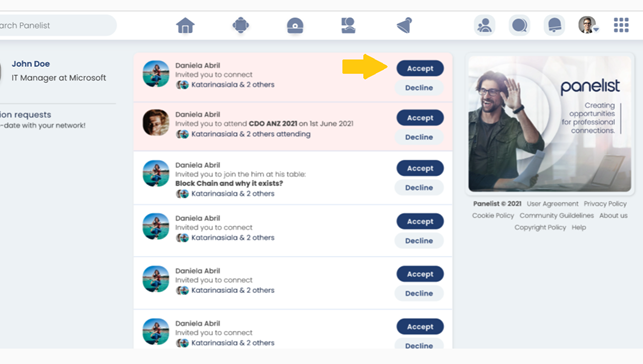
Accepting invitations to connect will add users to your list of connections. Accepting event invitations will add the event page and details to your event calendar, which you can access by clicking the ‘Event’ button on the top toolbar.
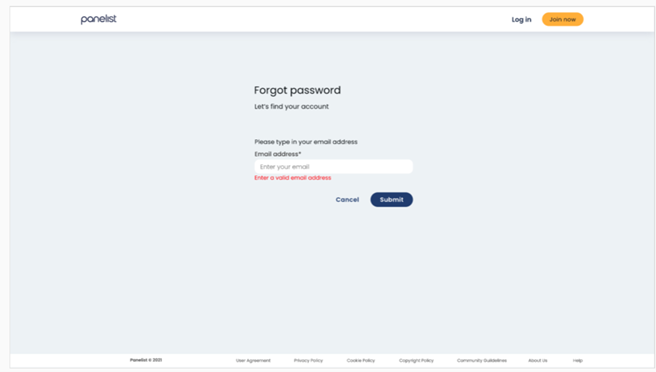
Password Reset
To reset a password if forgotten, tap on the forgot password option at the login screen. You will be required to enter your email address.
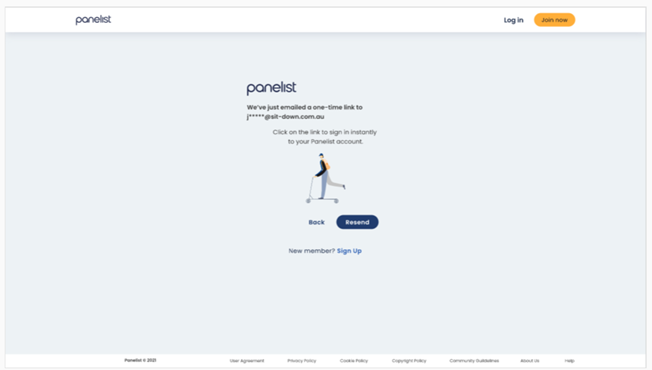
Once you’ve submitted your request, a one-time link will be sent to the email address you registered with.
Follow the link to arrive at a page that will require you to enter the code sent to your email address. Afterwards, you can input your new password.
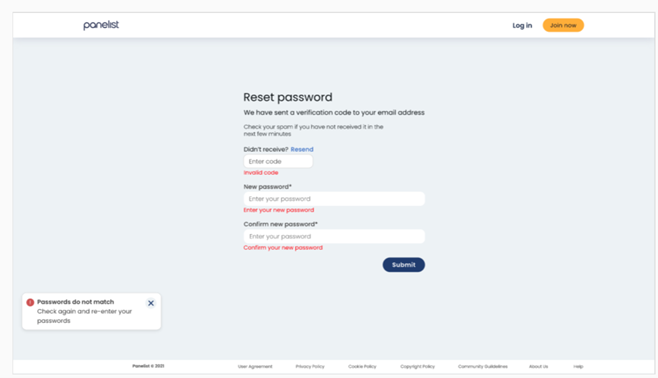
Use the new password alongside your email address to login into your account. Also keep the new password safe!
